Accessing Personal (G:), Web (W:), Common (H:) and Shared (H:, T: etc.) Areas on MS Windows
This document describes all steps involved in order to access (map) Personal (G: drive on EUI desktop PCs), Common (H: drive), Web (W: drive) or any other Departmental/Service Shared Area (S:, etc. drives) from your own laptop.
The below procedure has been tested on MS Windows XP Professional, MS Windows Vista Business and MS Windows 7 Professional. Screenshots are taken from Windows XP, thus may slightly differ from other versions:
- Your computer must be configured according to the Network Connection Configuration instructions;
- You must be connected to the EUI network either via LAN or WiFi (if on campus), or via VPN (if off-campus);
- You must have full Administrator rights on Windows.
Procedure
- Open up Windows Explorer and from the Tools menu choose Map Network Drive...;
If you are running Vista or Windows 7, first choose Computer from the list on the left then on the top menu, choose Map network drive:
- Select Drive G: (or alternative letter) and type in the Folder box:
\\server_name\your_EUI_username$ (e.g. \\ressrv1\jsmith$)
(IMPORTANT: do NOT omit the $ symbol at the end of your username!)
Please refer to the server list for the server_name where your Personal Area resides.
-
Tick Reconnect at logon to make the drive automatically available every time you logon thereafter:

Figure 1: Map Network Drive dialog window
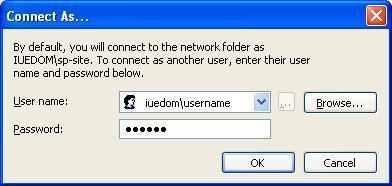
- Click on Connect using a different user name or Connect using different credentials (in Windows 7) and a new window will pop up (in Windows 7 once you click on Finish):
User name : iuedom\your_EUI_username (e.g. iuedom\jsmith)
Password : your_EUI_password
Confirm by clicking OK once:

Figure 2: Connect As... window
- Back in the previous window, choose Finish to end the procedure.
Your Personal Storage Area will now be available as Drive G: in (My) Computer.
Follow above steps 1) to 5) with the following changes:
Your Personal Web Area will now be available as Drive W: in (My) Computer.
Follow steps 1) to 5) with the following changes:
- Drive letter, choose: H (or alternative letter)
- Folder box, write: \\server_name\common (e.g. \\vspsrv1\common)
For the correct server name, please check the server list.
The Common Storage Area will now be available as Drive H: in (My) Computer.
The above documentation can be followed to map any (departmenatal/service) shared area you have at least read access to, as long as you know the server name and the path of the area you want to connect to.
Just follow steps 1) to 5) with the following changes:
- Drive letter, choose whatever available letter, e.g. S:
- Folder box, write: \\server_name\path (e.g. \\vspsrv1\Shares\ECO)
For the correct server name, please check the server list.
The Shared Area will now be available as Drive S: in (My) Computer.
The above documentation can be followed to map the Researchers' dedicated Scanned Docs folder as well, as long as you have already access to it [1].
Just follow steps 1) to 5) with the following changes:
- Drive letter, choose: P (or alternative letter)
- Folder box, write: \\ressrv1\common\_scanneddocs
The Scanned Docs folder will now be available as Drive P: (or alternative letter) in (My) Computer.
Please Note: NOT all EUI members have access to the researchers' Scanned Docs Folder: please inquire with Print Support for further details.
= Please refer to How to Scan from MultiFunction Printers for further information on the Scanned Docs folder.
Page last updated on 08 March 2022